Sprinter Broken Glow Plug Removal Tool Instructions

DennisB WiseAutoTools.com © Summary: Below are the basic instructions for using our B900-0199 Broken Glow Plug Removal Kit. This has saved our customers a lot of time and money because the job can be done over the fender without removing the cylinder head. It’s made to be used mainly on the Dodge Sprinter, but some of our customers have also used this kit on the Chevy Duramax. Read on for the instructions or go directly to our product listing for the B900-0199.
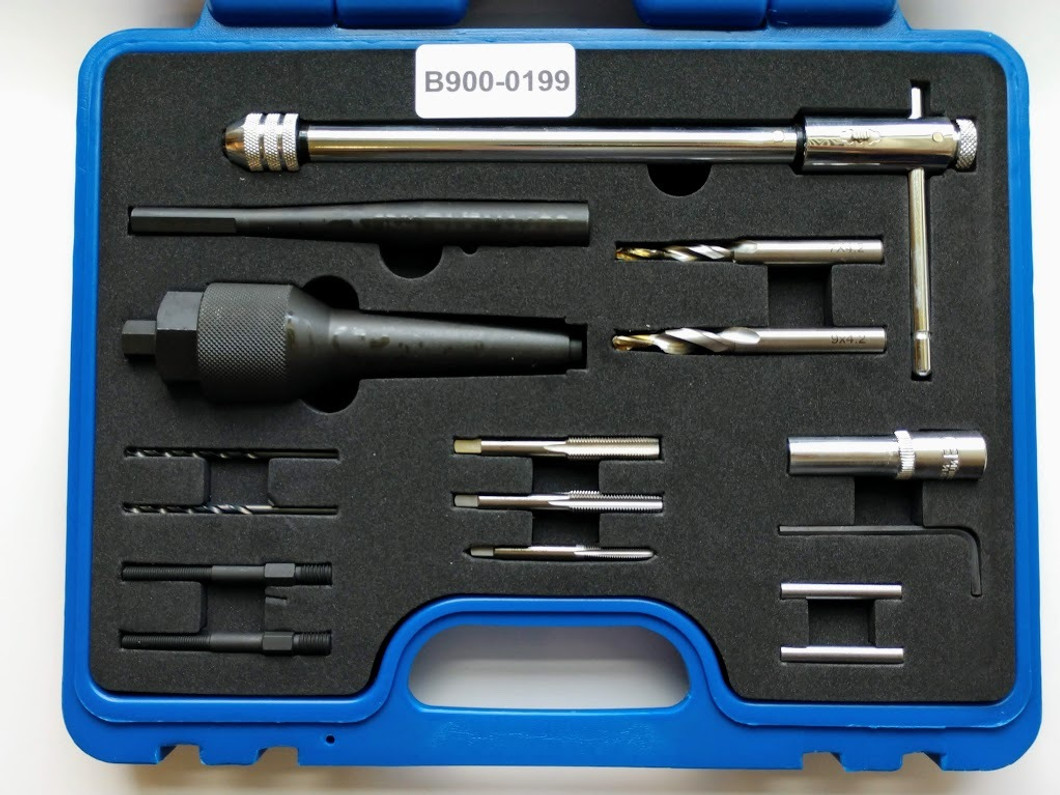
Suitable for glow plugs with either M8 x 1.0 thread or M10 x 1.0 thread. Set includes all necessary adapters, centering and thread cleaning tools to safely remove the damaged glow plug without damaging the cylinder head.
1.Ratchet T-Bar 5. Force nut (See 3) 9. Dual-size drill M10 13. Tap: M8 x 1.0
2. Drill holding adapter 6. Star socket 10. Pilot drill centering sleeves 14. Tap: M10 x1.0
3. Puller outer housing 7. Allen key 11. Pilot drills 3.5mm 15. Puller adapter mandrels
4. Force screw (See 3) 8. Dual-size step drill M8 12. Tap 1/4″
Precautions:
The cylinder head can be removed to help eliminate the possibility of debris getting inside the engine. However, many technicians have performed this job successfully on the vehicle without removing the head. It’s very important to ensure no metal is remaining in the engine which can cause rapid wear.
If cylinder head is to be left on during glow plug removal:
Turn the engine to close the valves for the cylinder being worked on isolating that chamber. This will prevent debris from going further inside the engine. Remove the
fuel injector and connect air from an air compressor which will help blow out and prevent debris from entering the cylinder. After the repair, and before installing the
glow plug, crank the engine over to help blow out any remaining debris from the cylinder. (Verify with a video inspection scope or bore scope to make sure there’s no
remaining debris in the cylinder).
Keep tools clean and well lubricated:
Use motor oil or grease (especially on taps) to help prevent binding and excessive wear.
Wear eye protection, especially when debris may become airborne.

Typical break is below the wrench flats and above the threads.
1. Place the star socket (6) on top of the glow plug. It may need to be tapped on gently with a hammer.
2. Using a 3/8″ ratchet, turn clockwise to break off the top part of the glow plug.
NOTE: When top portion of glow plug breaks, it may also shear off the inner glow plug electrode. If the inner electrode does not break, it can be removed completely from the glow plug body. In this case, go straight to step 5. If the inner electrode does shear off, then continue to step 3.
3. Position centering sleeve (10) onto the remaining part of the glow plug. It may need to be tapped on.
4. Using 3.5mm pilot drill (11) drill a pilot hole into remains of connector post/electrode. Drill down at least 15mm past uppermost part of the glow plug body.
5. Fit either M8 (8) or M10 (9) dual-size stepped drill (depending on the size of the glow plug) to the drill holding adapter (2). Secure stepped drill into adapter by tightening the set screw with the provided allen key (7) ensuring the set screw contacts the flat part on the shank of the stepped drill. Fit the drill holding adapter to chuck of power drill and drill out remains of connector post/electrode and threaded portion of glow plug body.
Important:
The dual-size step drill allows removal of the remains of the connector post/electrode while also removing the threaded portion of the glow plug body. Be sure to keep the drill straight so the threads in the cylinder head are not damaged. Drill down again at least 15mm to remove all of the threaded portion.
6. Use the correct size and thread pitch tap which may or may not be included. *Note the thread pitch could be different. Provided are common sized M8 x 1.0 (13) or M10 x 1.0 (14) tap (depending on size of glow plug). Place the correct tap in the ratchet T-Bar (1). Clean out and re-cut the threaded portion of cylinder head. Coat
the tap in grease to lubricate and also contain the metal shavings produced.
7. Take the 1/4″ tap and put into ratchet T-Bar (1). Cut threads into the remaining glow plug body. Again coat the tap in grease to lubricate and also contain the savings produced. Cut a full 15mm of thread. The remains of the glow plug body can now be removed.
8. Screw a puller adapter mandrel (15) into the 1/4″ threads that have just been cut.
9. Screw in the force screw (4) to the puller adapter mandrel.
10. Place the puller outer housing (3) over the force screw.
11. Screw on the force nut (5) with raised collar facing inwards.
12. Holding the force screw with a 12mm wrench or socket, run the force nut down with a 30mm wrench. This action will pull out the remaining part of the glow plug body from the cylinder head.
13. Before installing the new glow plug, thoroughly clean inside the port with a brush. Ensure that all metal shavings, dirt and debris are removed from the port, glow plug threads and combustion chamber before installing a new glow plug.
NOTE: All related tools are considered “consumable” and therefore are NOT covered under any type of warranty.
(Replacement step drill bits are available).
Recent Posts
-
Shorter Kits for Head Bolt Thread Repair - What are the downsides?
We recently came across an article that stated the more expensive, longer Time Sert kits made for he …28th Feb 2024 -
Polaris Head Bolt Thread Repair Kit - Information and Recommended Kit & Inserts
Aluminum head bolt threads pulling out on Polaris engines is a fairly common problem. Installing a s …23rd Jan 2024 -
How Bad Can Spark Plug Hole Erosion Get, and Can It Be Fixed?
How severely can a spark plug hole in an aluminum engine head, which previously had a repair insert …5th Dec 2023


